Quality guide lines from our glass supplier
What does all this mean to you? It means that glass is not perfect. If it is tempered it will have some imperfections. The heavier the glass the more noticeable they become. If you have concerns, please let me know about them because I inspect each piece. The small blanks like name plates and clocks are often free from defect. The larger and heavier the glass, the more likely to find small blemishes.
Quality Guidelines- Visual Inspection
For coated & non-coated glass
Our glass complies with the following ASTM Standards Specifications. All standards are for ¼” or less; glass thicker than ¼” and less than or equal to ½” may contain proportionally more and larger blemishes based on Quality-Q3. These specifications are based on monolithic single glass; multiple lites as in insulated glass and/or insulated glass with laminated glass; would qualify each lite for its appropriate specification or specifications and may contain proportionally more and larger blemishes. Multi-layers of heat-treated glass will result in a considerable higher level of roll wave distortion.
FLAT GLASS
ASTM C-1036-01 Standard Specification for Flat Glass
COATED GLASS
ASTM C- 1376-03 Standard Specification for Pyrolytic and Vacuum Deposition Coatings on Flat Glass
HEAT-TREATED GLASS
ASTM-C-1048-04 Standard Specification for Heat-Treated Flat Glass---Kind HS, Kind FT Coated and Uncoated Glass
LAMINATED GLASS
ASTM C- 1172-03 Standard Specification for Laminated Architectural Flat Glass
VISUAL INSPECTION FOR COATED & UNCOATED VISION GLASS
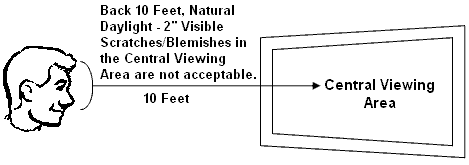
When viewed “Looking through the glass” and perpendicular to the surface using daylight (without direct sunlight), or with background lighting that simulates daylight, visible scratches or blemishes greater than 2”, detectable from 10 feet in the Central Viewing Area shall not be allowed. The Central Viewing Area is defined by 80% of the length and 80% of the width dimensions centered on a lite of glass. The remaining area is considered the outer area. Pinholes 1/16” max are allowed in the Central Viewing area and 3/32” in the Outer. No more than two readily apparent blemishes are allowed in a 3” diameter circle, and no more than five are allowed in a 12-in. circle.

Glass Edge Tolerances: Insulated Glass Tolerances:
Laminated Glass Offset + 1/4”/ -1/8” Insulated Spacer Sight line 1/2" + 1/16”
Shell Chips Less than 1/4” Allowed Insulated Sealant Sight line 9/16” + 1/16”
Insulated Glass Offset (+/-) 1/8”
Dimensional Tolerances: Muntin Alignment (+/-) 1/4"
Single Glass (up to 1/4” ) - (+/-) 1/16” Insulated Glass Thickness (-) 1/16” (+) 1/32”
Single Glass (3/8” & 1/2") - (+/-) 1/8”
Laminated Glass- +1/4”/ -1/8”
Insulated Glass- (+/-) 1/8”
Polished Glass- 1/8-1/4” (+/-) 1/16”
Polished Glass- 3/8-1/2” (+/-) 1/8”


